
DR. CHRIS GRANT
Sports Specialist Chiropractor
(705)726-4331
90/90 End-Range Contractions
Purpose: To improve hip range of motion
Points of Interest: 90/90 End-Range Contractions are a challenging exercise. It is normal to experience some cramping as you challenge yourself with this exercise.
Instructions: Begin in a 90/90 position. One leg will go in front of your body with the knee bent to 90 degrees. The other leg will go directly to the side with the knee bent 90 degrees behind you. You will cycle between passive stretching (being in the stretching position), agonist contraction and antagonist contraction. Each cycle position will last for 15 seconds and you will go through 3 cycles to take a total of 2 minutes and 15 seconds. When you are stretching the front hip your goal is to have the hips and pelvis facing directly forwards. When you are stretching the back you will turn your hips to square off to the back leg to the best of your abilities.
Front Hip

Passive Stretching
This is the type of stretching you are likely used to doing. It is simply the act of having your internal rotators of the front hip in a lengthened position. Hold for 15 seconds.
Agonist Contraction
While you are in a stretched position, you will contract (tense up) your internal rotators of the front hip by pushing your shin and foot into the ground. Hold for 15 seconds.
Antagonist Contraction
While you are in a stretched position, you will contract (tense up) your external rotators of the front hip by trying to lift your shin and foot off the ground. Hold for 15 seconds.
Back Hip
Passive Stretching
This is the type of stretching you are likely used to doing. It is simply the act of having your external rotators of the back hip in a lengthened position. Hold for 15 seconds.
Agonist Contraction
While you are in a stretched position, you will contract (tense up) your external rotators of the back hip by pushing your shin and foot into the ground. Hold for 15 seconds.
Antagonist Contraction
While you are in a stretched position, you will contract (tense up) your internal rotators of the back hip by trying to lift your shin and foot off the ground. Hold for 15 seconds.
90/90 (Supine)
Purpose: To improve hip range of motion
Points of Interest: This exercise can be helpful for those who are finding it difficult or painful to get into the seated 90/90 position
Instructions: Begin lying on your back with your feet wider than hip width apart and your knees bent 90 degrees. Place your hands under the small of your low back (or on your hips) if your shoulders will allow. Flex your ankles so your toes pull towards your shins. Drop both knees to the same side without allowing your lower back to lift from the floor or your hands. Hold for 10 seconds. Repeat on the other side


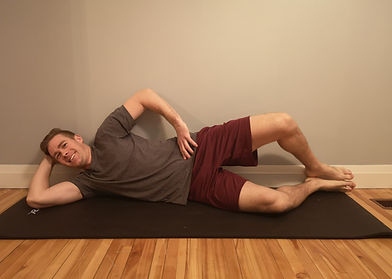
Clamshell
Purpose: The clamshell exercise strengthens the gluteus medius which helps to promote proper gait and pelvic stabilization. This exercise should be mastered before progressing to weightbearing exercises such as the monster walk.
Points of Interest: This exercise should initially be completed without resistance. When able to complete 30 pain-free repetitions with fatigue localized to the gluteus medius, then progress to using a resistance band around your knees.
Instructions: Lie on your side with your back against a wall. Your head, shoulders, hips and heels should be against the wall. Your knees should be bent approximately 90 degrees. Engage your core muscles. Keeping your heels together, lift your top knee while keeping your heels together. Your pelvis and low back should not move at all during this exercise.

Couch Stretch
Goblet Squat Holds
Purpose: Goblet squat holds are designed to increase range of motion in your hip and adductors. They will allow for increase comfort and control in a deep squat.
Instructions: Throughout this exercise your must focus on keeping your spine in a neutral position (i.e. avoid rounding of your back). Throughout the exercise your knee position should be between your 1st and 2nd toes.

Initial Position:
Place your feet about hip width apart and rotated out 45 degrees. Assume the "prayer position" with your hands.

Transition:
Bend at the waist until your elbows are on the inside of your knees. Pull inwards with your knees. At the same time push outwards with your arms.

Finished Position:
Raise your chest to maintain a neutral spine. Sit deeper, while pulling in with your knees and pushing out with your elbows.
Double Leg Squat
Purpose: This exercise is a functional movement pattern that everyone should work to develop. It challenges spinal stability and alignment of the lower kinetic chain.
Instructions: Stand with your feet approximately hip width apart. Aim to keep feet forwards, but a slight external rotation is acceptable. Stand tall with good posture and cross your arms over your chest. Slowly lower into a squat position
** Feet must remain straight with heels on the floor
** Knees must remain in line over your second toe
** Keep your chest up (imagine you are showing off the logo on the front of your shirt). Performing this exercise while facing a wall can be helpful for preventing the torso from falling forward.


Watch For:

Bending Forward at the Waist

Turning Toes Out

Knees Buckling In

Shifting to One Side
Hamstring Stretch with Band
Purpose: To lengthen the hamstrings which will improve range of motion of your hips and decrease the load on your low back.
Instructions: Place a strap or towel under the arch of your foot. Straighten your knee and keep your foot pulled toward you. Use the strap to pull the leg up until you feel a stretch along the back of your leg. Try to keep the leg relaxed and heavy in the strap. Ensure that you are breathing. Begin with 20 second holds and progress yourself up to 2 minute holds as your symptoms allow. Add to this stretch by bringing your leg across your body and out to the side (as seen in pictures)


Hip Circle with External Rotation
Hip Controlled Articular Rotations (CARs)
Purpose: Controlled articular rotations (CARs) are designed to improve joint range of motion and your control of the joint through its full range of motion
Points of Interest: CARs can be completed in a variety of positions (standing, quadruped, side-lying, etc.). However, no matter what position they are completed in a focus on lumbopelvic stability is required to isolate hip movement.
Instructions: You will complete 5 repetitions in a clockwise and counter-clockwise direction. The movement should be slow and controlled as you explore your full joint range of motion
1. Without moving low low back or pelvis, lift your leg up as high as you can in front of you (bent knee)
2. While maintaining your leg as high as you can, bring your leg as far as you can to the side.
3. While maintaining that position, rotate your leg like you are stepping over a gate.
4. Reach your leg back as far as you can (without arching your low back) and then return to a standing position.
Hip Flexor Stretch (Back Leg on Step/Couch)
Purpose: This exercise will preferentially lengthen the rectus femoris (the only quadricep muscle that crosses the hip) which will increase hip extension and knee flexion range of motion and decrease the pull into an anterior pelvic tilt.
Points of Interest: If you feel this stretch in the lower back area, relax, readjust your position and try again. If you have initiated a pelvic tilt properly, the stretch should be felt only in the front of the hip and/or thigh. Give yourself adequate padding under your knee to prevent irritation of the knee.
Instructions: Go into a half-kneeling position (one knee on the ground). Place the foot of the back leg onto the couch or a step. Ensure that your front foot is facing straight forward, and the shin of the back leg is directed straight backward. Create length through your spine by imagining someone is pulling gently on the top of your head. Create a pelvic tilt to relieve pressure on your lumbar spine (avoid lumbar spine hyperextension). You should feel a stretch at the front of your thigh that is up on the step/couch. Work yourself up to holding this position for 2 minutes.

Hip Flexor Stretch (End-Range Contractions)
Purpose: This stretching progression is a principle is a progression that can be used with any of the prescribed hip flexor stretches. Stretching will create a temporary lengthening of your muscles. However, your nervous system controls your muscles and over time they will tighten back up again. This exercise is designed to challenge your nervous system by using your muscles at a very short or very long length. After mastering these exercises you will gain control through your range of motion.
Points of Interest: Do not be concerned if you experience cramping during this exercise. Cramping is the result of challenging your muscles and nervous system in ranges of motion they are not used to being used. If you experience cramping you can get out of that position and then try again later. The more you do this, the longer you will be able to hold the contraction without experiencing cramping.
Instructions: I will use the hip flexor stretch (kneeling) as an example, but the concept can be applied to any of the hip flexor stretches. You will cycle between passive stretching (being in the stretching position), agonist (hip flexor) contraction and antagonist (gluteus maximus) contraction. Each cycle position will last for 15 seconds and you will go through 3 cycles to take a total of 2 minutes and 15 seconds.

Passive Stretching
This is the type of stretching you are likely used to doing. It is simply the act of having your hip flexors in a lengthened position. Hold for 15 seconds.

Agonist Contraction
While you are in a stretched position, you will contract (tense up) your hip flexor as if you are trying to drag your knee forward on the ground. Don't actually drag the knee, just meet the resistance of the ground). Hold for 15 seconds.

Antagonist Contraction
While you are in a stretched position, you will contract (tense up) your gluteus maximus. This will push your hips further forwards and create a more intense stretch of your hip flexor. Hold for 15 seconds.
Hip Flexor Stretch (Front Leg on Step)
Purpose: To lengthen the iliacus and psoas (hip flexors) which will increase hip extension range of motion and decrease compression on the lumbar spine. This modification from the kneeling hip flexor stretch can be used if kneeling irritates your knee.
Points of Interest: If you feel this stretch in the lower back area, relax, readjust your position and try again. If you have initiated a pelvic tilt properly, the stretch should be felt only in the front of the hip and/or thigh.
Instructions: Step one leg up onto a step and leave the other leg on the ground. Ensure that your feet are facing straight forward. Create length through your spine by imagining someone is pulling gently on the top of your head. Create a pelvic tilt to relieve pressure on your lumbar spine (avoid lumbar spine hyperextension). You should feel a stretch at the front of your hip/thigh that is on the ground. Work yourself up to holding this position for 2 minutes.

Hip Flexor Stretch (Kneeling)
Purpose: To lengthen the iliacus and psoas (hip flexors) which will increase hip extension range of motion and decrease compression on the lumbar spine
Points of Interest: If you feel this stretch in the lower back area, relax, readjust your position and try again. If you have initiated a pelvic tilt properly, the stretch should be felt only in the front of the hip and/or thigh. Give yourself adequate padding under your knee to prevent irritation of the knee.
Instructions: Go into a half-kneeling position (one knee on the ground). Ensure that your foot is facing straight forward on the front leg, and straight backward on the back leg. Create length through your spine by imagining someone is pulling gently on the top of your head. Create a pelvic tilt to relieve pressure on your lumbar spine (avoid lumbar spine hyperextension). You should feel a stretch at the front of your hip/thigh that is kneeling. Work yourself up to holding this position for 2 minutes.

Hip Hinge with Dowel
Purpose: To develop the hip hinge pattern which will spare the low back.
Points of Interest: Evidence demonstrates that disc herniations occur as a result of repeated flexion and rotation under load. This exercise helps to develop a movement pattern that prevents lumbar spine flexion by utilizing hip motion.
Instructions: Place a dowel along your back so that it is contacting your buttocks, between your shoulder blades and the back of your head. Hold onto the dowel with one hand in the small of the low back and the other behind your neck. With soft knees, push your buttock backwards as you bend forwards. You should feel tension building in the back of your legs. Ensure that you maintain all three points of contact with the dowel throughout the movement


Hip Internal Rotation Mini Glute Bridge
Kneeling Hip Flexor Stretch
Kneeling TFL Stretch
Lateral Line Stretch
Purpose: There is a line of muscles and fascia that run along the lateral aspects of our body. This exercise is designed to stretch those tissues.
Instructions: Stand tall and reach one arm overhead. Step forward with the opposite foot and land in a lunge position. Both knees should be close to 90 degrees. Reach overhead and to the side while pushing your hip outward. Hold this position for 20 seconds while breathing comfortably.
* Don't forget to push your hip out to the side


Lunge
Purpose: The lunge will challenge the lower kinetic chain as the narrow base of support will require lateral stability.
Point of Interest: This exercise requires attention to detail, as quality is more important than the quantity of repetitions.
Instructions: Stand in a split stance with the feet facing forward and your knees slightly bent. Engage abdominal musculature. Slowly lower your back knee to the floor. Ensure that the front knee does not travel over the toes. Ensure your knee is in line between your big toe and second toe.
Avoid:
1. Excessive curvature of the low back
2. Knee deviation in or out (should be between your big toe and second toe)
Progression: Once you can complete two sets of 10 static repetitions without fatigue, progress to walking lunges, walking lunges with dumbbells, walking lunges with dumbbells overhead and finally lunges on a balance beam.


Monster Walk
Purpose: The monster walk is designed to strengthen the gluteus medius in an upright, functional manner
Points of Interest: This exercise is an advanced progression. Before attempting this exercise you should demonstrate proper muscle recruitment in non-weightbearing exercises such as the clamshell or side-lying abduction.
Instructions: With the band at the appropriate height, walk forward while keeping your feet shoulder width apart and parallel to each other. Take as long of a step as you can control while maintaining your feet shoulder width apart. You should keep your knees straight and avoid the torso tilting or leaning. Repeat while walking backwards
Progression:
Level 1 - Band above knees
Level 2 - Band below knees
Level 3 - Band at ankles
Level 4 - Band at forefoot


Pigeon Pose
Piriformis Stretch (Figure 4)
Purpose: This exercise is designed to decrease tension in the piriformis muscle, which passes over the sciatic nerve.
Instructions: Begin lying on your back. Cross the ankle of your affected leg over the opposite knee. Using both hands, grab the thigh of the unaffected leg and pull it toward your chest. You should feel a stretch in your buttocks. Remember to breathe comfortably. Start with 20 second holds and work yourself up to 2 minute holds as your symptoms allow.


Reverse Nordic
Purpose: To eccentrically strengthen the rectus femoris (quadriceps) and challenge spinal stability.
Points of Interest: The Reverse Nordic exercise is an advanced exercise and should only be performed by those who can demonstrate proficiency with core stabilization.
Instructions: Begin in a kneeling position, with the knees hip width apart. Cross your arms across your chest. Engage your abdominal musculature and maintain this bracing throughout the exercise. Slowly bring the body backwards by bending at the knees. This exercise should be performed slowly and in control throughout the entire range of motion. Avoid hyperextending or bending the low back.
Progression: Instead of crossing your arms across your chest you can reach your arms overhead. Be sure your arms stay in the same plane as your torso.


Reverse Triangle Pose
Purpose: To stretch the spiral line (the obliques and groin on the opposite side)
Points of Interest: If you find that one side is more difficult, or results in a larger stretch, complete extra repetitions on the tighter side to create balance.
Instructions: Begin with your feet wider than shoulder width apart and arms reaching straight out to the sides at shoulder height. Turn one foot outward. Reach your opposite hand toward that foot and the other hand toward the ceiling to create a vertical line.
* This version increases the stretch felt in the hamstrings and involves less groin/adductor.

Standing Quad Stretch
Tactical Frog
Purpose: The tactical frog helps to lengthen the short adductors which placing increasing demands on lumbopelvic stability.
Instructions: Start on your hands and knees with your knees slightly wider than hip width and your feet together. Turn your tailbone up toward the ceiling. Maintain the turned up pelvic position as you sit back toward the heels. Hold for 20 seconds and repeat 3 times.


Triangle Pose
Purpose: To stretch the spiral line (the obliques and groin on the opposite side)
Points of Interest: If you find that one side is more difficult, or results in a larger stretch, complete extra repetitions on the tighter side to create balance.
Instructions: Begin with feet wider than hip width, and arms straight out to the sides at shoulder height. Turn one foot outward. Keep hips facing forward, and shift the ribcage toward the turned-out foot. Maintain a vertical line with the arms as you reach down to (or behind) the ankle, depending on your flexibility

Wall Side Bend
X-Band Walk
Purpose: To activate the gluteus medius in an upright position
Instructions: Place a resistance band under your feet and step so feet are hip width apart. Ensure your feet are pointing straight in front with your knees in line with your big toes. Grab the ends of the bands and cross them so it resembles an "X" formation, when holding the ends at hip height. Brace your core and keep a neutral spine. Step to the side for 3 steps, then repeat in the opposite direction.
Avoid:
-
Back arching
-
Toes turning in
-
Knees collapsing in
-
Chest falling forwards

